Whether it’s Astros or any headphones, sound plays a crucial element in their performance. Astro’s sound is a super delight to the ears. But what if this lovely audio becomes annoying with a sudden squealing noise and a screechy, punchy bass? Or what if the game you’re playing causes your eardrums to burst with loud gunshot sounds? This is because you didn’t properly execute the sound settings that made the same blissful headphones a nightmare for you.
This article includes all the proper Astro A40 Audio settings relating to PC / Mac, and Mixamp. From gaming settings on any console to the most trending games such as Pubg, WArzone’s preset settings with Dolby Atmos sound settings are all there to make you feel more immersed in the audio.
Astro A40 Best Sound Settings For PC
If you are habitual using your gaming cans on a PC or laptop then the following is a sound setting you need.
Solution
If you have windows;
- Tap the start button > Go to Control Panel > Tap Sound.
- Sound options will appear within the sound menu.
- Click Astro A40 Game > with right click to the mouse > make it as a Default Device.
- Now, click Astro A40 Voice > with right click to the mouse > make it a Default Communication Device.
That’s it with the sound settings! You’re all set to enjoy your Astro A40 headset on PC.
Astro A40 Sound Settings For Mac
Astros Headsets possess the charm of connecting to every other device which can be thought of! The below settings are for Mac;
Solution
- Click the Apple Icon > Open System Preferences > open the Sound Settings.
- Make sure the Input Tab is on Astro Voice.
- Ensure the Output Tab is on Astro Game.
Following the above steps will prepare your headset to move and groove with your Mac.
Astro A40 Audio Sound Settings For Xbox
To get the maximum benefit of your Astro A40 Headset while playing on Xbox, your system may need the following settings;
Solution
- Navigate to Sound Settings > Display and Sounds > click the Audio Output.
- Choose the following options for Audio Output Option;
- For the HDMI audio > turn it “OFF”.
- For the Optical Audio > Select Bitstream Out.
- For the Bitstream format > choose Dolby Digital.
This is all that needs to be done for the sound settings of Astros with Xbox.
Check out our troubleshooting guide for Astro a40
Astro A40 Mixamp Sound Settings
After plugging your Mixamp into the PC, it’s time to do the sound settings for the Mixamp. Undoubtedly Mix amps are great for equalizing different sounds such as in-game chat to in-game sound balancing and many more.
Solution
- Check the Mixamp for firmware updates before the setting.
- For the Mixamp, you will come up with two different sound settings, Pro-Voice and Pro-Game.
- Pro Voice is the main Microphone Output and should be set to Default Device to capture your voice.
- Astro Mixamp Pro Game is the Audio Output. It can be configured by using the Astro Command Center on the PC.
- Everything can be set separately in this Astro Command Center mode by using sliders.
- You can adjust overall volume output, game audio, chat audio, microphone volume, etc
- For Microphone > Noise Gate set to Streaming Mode.
- Mic Sidetone set up.
- You can preset your EQ settings according to your needs.
Note; It’s highly recommended to download ACC to get the full potential out of your Mixamp and headphones.
Astro A40 Settings For Music
You must own a Mixamp device to listen to the perfect music on your headset. After the initial setup of sound settings mentioned in the above section which is done through the Command Center, You can set the best EQ settings for flawless, clear sound.
Solution
Here, you have the EQ settings for your music;
Eq Band 1 = 7
Eq Band 2 = 0
Eq Band 3 = 4
Eq_Band 4 = 5
Eq_Band 5 = 4
Eq_Freq Band 1 = 196
Eq_Freq Band 2 = 1200
Eq_Freq Ban 3 = 3864
Eq_Freq Band 4 = 7832
Eq_Freq Band 5 = 15000
Eq_Bandwidth 2 = 2.6
Eq_Bandwidth 3 = 2.4
Eq_Bandwidth 4 = 2.8
You can have the best music experience by applying these sound settings to your Astro A40 Headsets.
Astro A40 Xbox One Audio Settings
Astro A40s Headsets are compatible with Xbox One. But for an uninterrupted experience, you might get know-how about the audio setting for it.
Solution
- Check the Mixamp for firmware updates before the setting.
- Go to the Setting for Xbox One > open Kinect Menu > uncheck “Use Kinect Microphone for Chat”.
- Make sure to click check on “Kinect on Option”.
- Go back to Sound Settings > open Display and Sound.
- Under Digital Audio > open HDMI Audio > select “OFF”
- Then, In Optical Audio > Select Bitstream Out.
- Go down to Bitstream Format > choose Dolby Digital.
Now your Astro A40 is all set to use with PlayStation 4.
Astro A40 Settings For Xbox Series X
Following is a simple sound setting for your Xbox X.
Solution
- By pressing the Xbox button on your controller, you can access the Settings menu after opening the Xbox menu.
- Go to the menu for volume and audio output options.
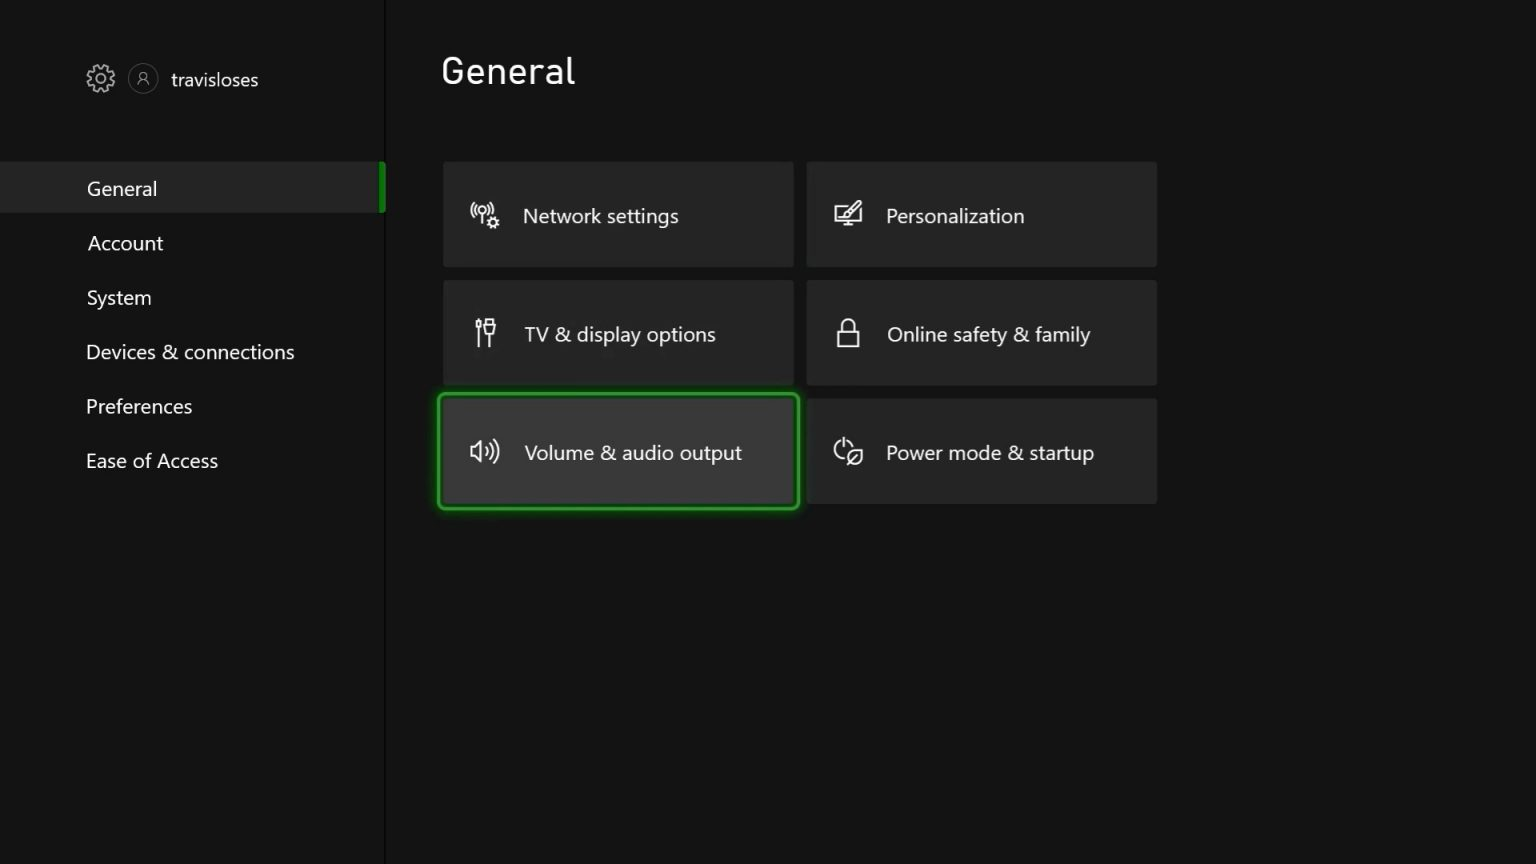
- Set Party conversation output to Headset under the Volume Options section.
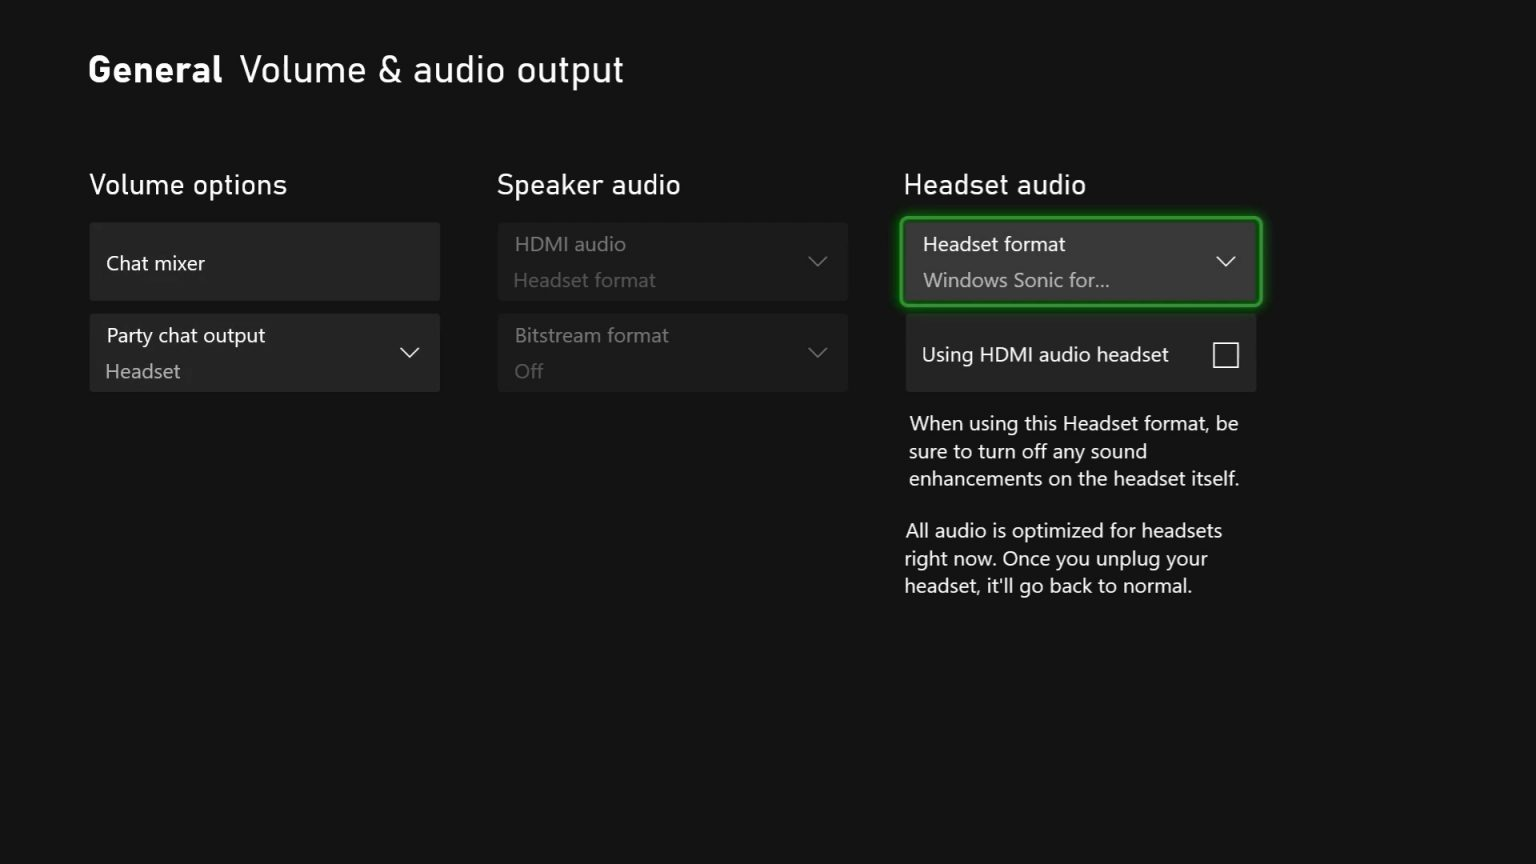
- Make sure that Windows Sonic for Headphones is selected as the headset format under Headset audio.
- Choose that option if you have a Dolby Atmos license instead, and then utilize the Dolby Access app to adjust more Equalizer and audio settings.
- You can now close the settings and enjoy your console with Astro A40 Headphones.
Note: Be sure to check in-game choices for potential player muting or another audio setup because these settings can vary from game to game.
Astro A40 PS4 Sound Settings
Following is the Astro A40 sound settings for PS4;
Solution
Make sure to connect the Base Station and set it to PC Mode.
For console settings;
- Go to Sound and Screen > click the Audio Output Settings.
- In Primary Output Port Option > choose Digital Out (Optical) > Dolby Digital 5.1ch.
- Click “OK”.
For In-game settings;
- In Audio Output Settings > Audio Format > choose Bitstream (Dolby)
- Set Audio Preset > Headphones
- For Audio Mix > choose High Boost for the clear sound of footsteps.
- On Mixamp, play with Dolby Enabled, and keep the volume around the 11 to 12 o’clock range
- Tweak some EQ settings which give you unbelievable sound.
- Take 95 all the way down to -7, and leave all the other sliders to Astro default.
For the Advance Mixamp Settings for PS4;
Eq Band 1 = – 7
Eq Band 2 = -2
Eq Band 3 = -1
Eq Band 4 = 7
Eq Band 5 = 1
Eq Freq Band 1 = 130
Eq Freq Band 2 = 782
Eq Freq Ban 3 = 1867
Eq Freq Band 4 = 4618
Eq Freq Band 5 = 13835
Eq Bandwidth 2 = 1.9
Eq Bandwidth 3 = 2.2
Eq Bandwidth 4 = 1.8
This is the setting that you need to have for an outstanding experience of Mixamp with PS4 or else you can experiment with different EQ settings as well.
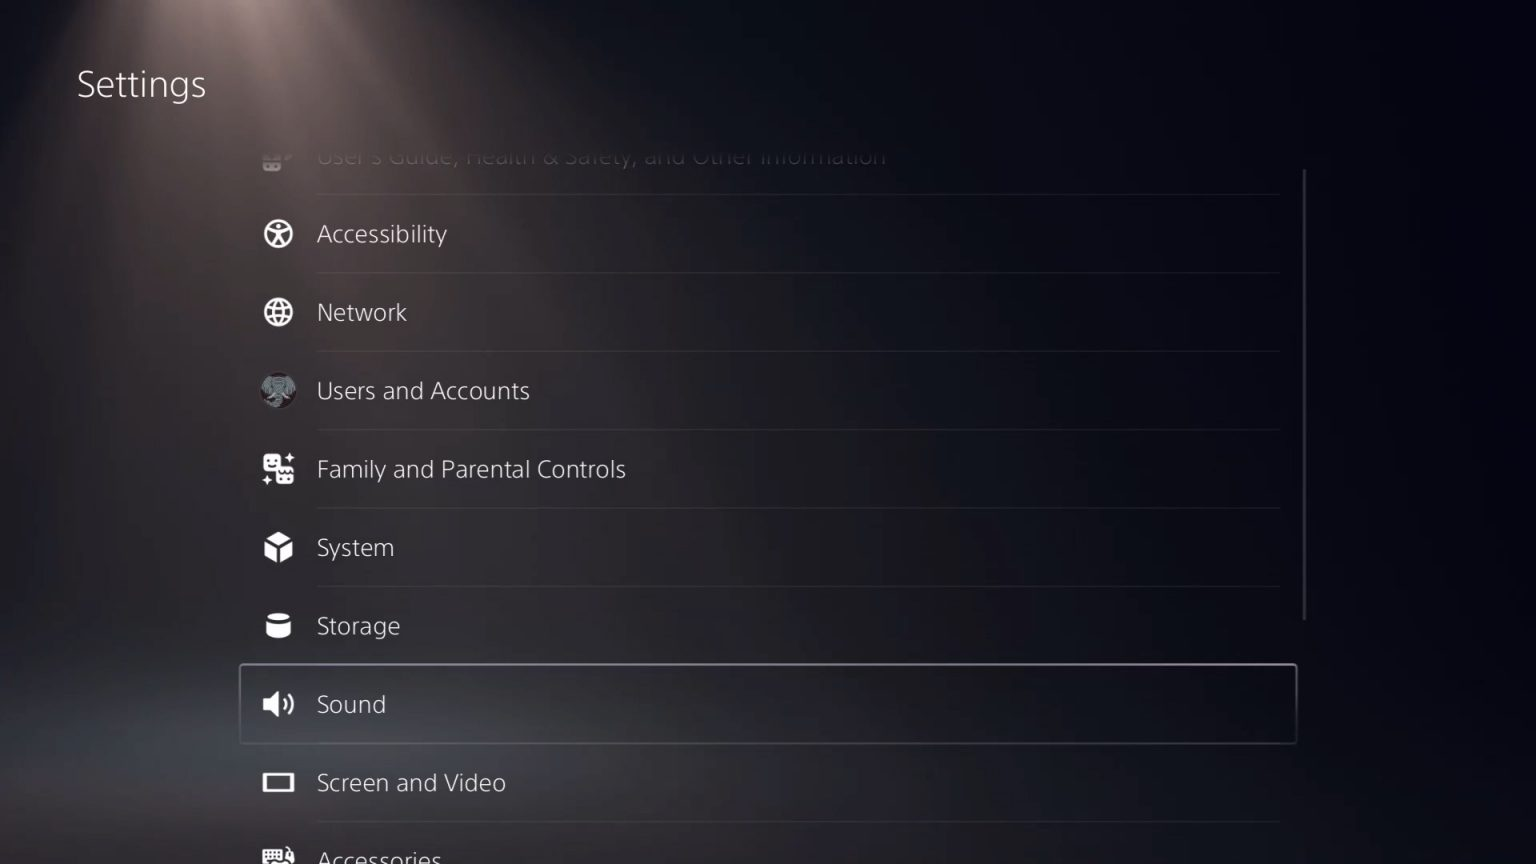
Astro A40 PS5 Audio Sound Settings
Before using Astros with Mixamp, Make sure its firmware is up to date. Follow the mentioned steps to have fun with your headsets with your PS5.
Solution
- Go to settings on your console.
- Tap ‘Sounds’ in the menu.
- Set the Input Device to USB Headset under the Microphone settings section (Astro MixAmp Pro).

- Set the Output Device to USB Headset under Audio Output (Astro MixAmp Pro).
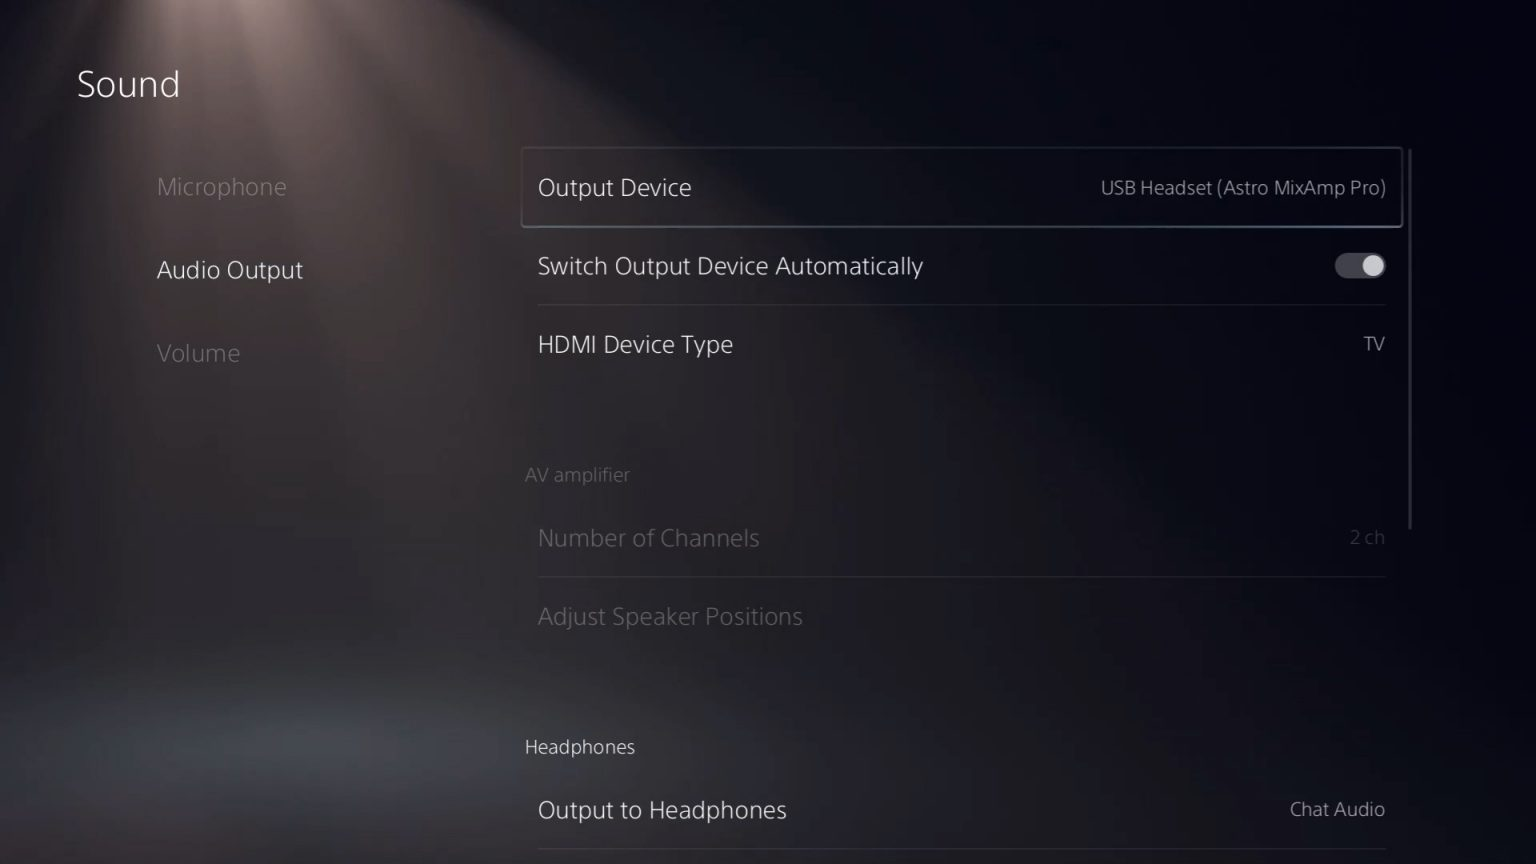
- Set Output to Headphones to Chat Audio under Headphones.
Note: Choose Chat Audio instead of All Audios because your voice chat will get through the USB connection and Game Audio is transferred through an HDMI connection. This activates your MixAmp’s Game: Voice balance, EQ profile, and Dolby processing.
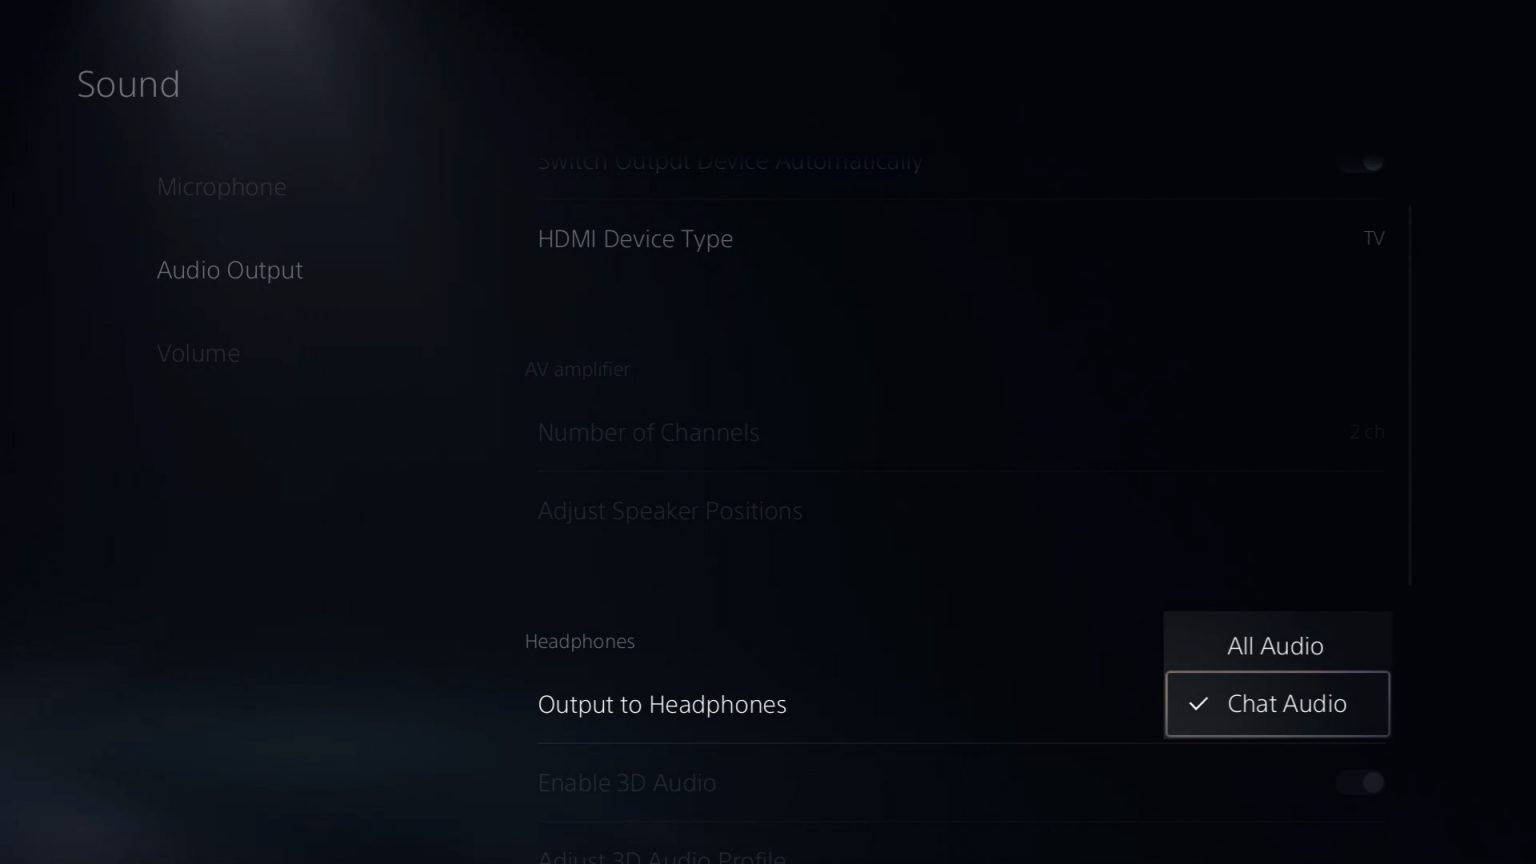
- Change the AV amplifier from HDMI Device Type.

- Change Number of Channels under the AV amplifier to 5.1 ch.

- Change Audio Format (Priority) to Bitstream under General (Dolby).

- Your TV or home theater system’s speakers should be muted or turned down.
- Check in-game settings regarding other player muting or different setups for other features.
The settings are done for PS5.
Astro A40 Sound Settings For Warzone
Here are some steps to follow for the warzone sound settings that you always want to get your hands on.
Solution
Configure the game’s audio settings first;
- Boost High/Boost is found under Audio > Audio Mix (in this you can hear the footsteps clearly).
- Set Volume master: 85%
- Noise level: 0%
- 0% of the dialogue volume.
- 100% Effects Volume.
- Voice Chat is activated.
- Mic Open Voice Chat Volume: 150.00, Recording Threshold: 3.16, Microphone Volume: 120.00.
- No impact from voice chat.
Nothing very complicated about it; you can set the remaining volumes following standards or according to your preferences.
Set the Astro Command Center Audio preferences now;
- Choose the Balanced Category, and then set the first row to 1, the second row to -5, and the remaining rows to 4, 3, and 5 correspondingly.
- Click Sync it to the device after the settings are complete.
The sound settings are finished here. You’ll be able to hear those important sound cues in crystal clear focus, which will help you win.
Astro A40 Sound Settings For PUBG
Pubg is a game every other teenager is playing. Knowing the sound settings for this game is crucial for most of the gaming community. The following are the steps;
Solution
- First, make sure to switch the connected device to PC Mode.
- Be sure to download the Astro Command Center software to get the most out of these sound settings.
- In the Astro Command Center > see for Preset Library.
- In the first Preset Settings > switch the “Dolby Mode ON”. This simulates the surround sound settings.
- In the second Preset Settings > switch the “Dolby Mode OFF” This will turn the surround sound off.
Following are the frequencies and bandwidths of the sliders;
For Astro A40 Preset 1 (Surround On)
Eq Band 1 = +7
Eq Band 2 = +7
Eq Band 3 = +7
Eq Band 4 = +7
Eq Band 5 = +7
Eq Freq Band 1 = 122
Eq Freq Band 2 = 566
Eq Freq Ban 3 = 2279
Eq Freq Band 4 = 3597
Eq Freq Band 5 = 8520
Eq Bandwidth 2 = 1.9
Eq Bandwidth 3 = 2.2
Eq Bandwidth 4 = 1.8
For Astro A40 Preset 2 (Surround Off)
Eq Band 1 = +7
Eq Band 2 = +7
Eq Band 3 = +7
Eq Band 4 = +7
Eq Band 5 = +7
Eq Freq Band 1 = 98
Eq Freq Band 2 = 1850
Eq Freq Ban 3 = 4882
Eq Freq Band 4 = 7832
Eq Freq Band 5 = 13824
Eq Bandwidth 2 = 2.2
Eq Bandwidth 3 = 2.0
Eq Bandwidth 4 = 2.2
Make sure to turn the Dolby Mode off for Microphone settings as well.
Astro A40 Settings For Apex Legends
These are the most competitive games that serious game players play and live stream as well. The best sound settings for them can make or break the player’s confidence. So here are the preset sound settings for this super trending game with the Astro A40s.
Solution
First and foremost, download the Astro Command Center from the Astros website.
You can tweak the settings on equalizers by the AstroCommand Center according to your likes.
Note the following preset settings for Apex Legends;
Eq Band 1 = +7
Eq Band 2 = +7
Eq Band 3 = +7
Eq Band 4 = +7
Eq Band 5 = +7
Eq Freq Band 1 = 95
Eq Freq Band 2 = 271
Eq Freq Ban 3 = 1011
Eq Freq Band 4 = 3572
Eq Freq Band 5 = 6799
Eq Bandwidth 2 = 2.0
Eq Bandwidth 3 = 2.0
Eq Bandwidth 4 = 2.0
Your Astro A40 Headset is all set to go loud and clear with the above settings.
Astro A40 Settings For footsteps
Can you imagine for a player, missing footsteps sound in a crucial game one after the other? Maybe he could get lucky one time but the chances are rare and he will eventually be shot dead pretty soon and boom! The game is over for him.
Solution
- To hear the footsteps sound in Call of Duty;
- For hearing a crystal clear sound of footsteps, you need to do one simple tweak in your Astro Command’s preset settings which are;
- Change 95 all the way down to -7, it limits the excess base which tends to cancel all the high and mids frequency footsteps.
- Lowering the bass response emphasizes all the mids and highs > and allows you to hear footsteps loud and clear.
- The rest of the EQ settings are left on their default settings.
- Adjust the Microphone Noise Gate > Streaming/ Night Mode (improves mic quality)
- Make sure the PS4 Sound setting > should be Optical Bitstream Dolby.
In Other competitive games including Call of Duty, you can set your preset settings for footsteps like this;
Go to Advanced Settings.
Eq Band 1 = +2 dB
Eq Band 2 = +2 dB
Eq Band 3 = +1 dB
Eq Band 4 = +3 dB
Eq Band 5 = +4 dB
Eq Freq Band 1 = 122 Hz
Eq Freq Band 2 = 419 Hz
Eq Freq Ban 3 = 750 Hz
Eq Freq Band 4 = 5330 Hz
Eq Freq Band 5 = 12237 Hz
Eq Bandwidth 2 = 2.0
Eq Bandwidth 3 = 2.0
Eq Bandwidth 4 = 0.7
Click Saved. Everyone’s ears are different so the settings can differ and vary accordingly.
Note: Save it for custom settings as many don’t like to set these because they are just for the footstep sounds.
Astro A40 Fortnite Settings
This is another trending game in the gaming community. The best sound settings are as follows;
Solution
Open Astro Command Center > go to Advanced Settings.
Do this preset settings;
Eq Band 1 = +7dB
Eq Band 2 = + 7dB
Eq Band 3 = + 7dB
Eq Band 4 = + 7dB
Eq Band 5 = + 7dB
Eq Freq Band 1 = 90Hz
Eq Freq Band 2 = 410 Hz
Eq Freq Ban 3 = 1027Hz
Eq Freq Band 4 = 3354Hz
Eq Freq Band 5 = 6888 Hz
Eq Bandwidth 2 = 1.2
Eq Bandwidth 3 = 1.2
Eq Bandwidth 4 = 0.8
This preset setting makes the base moderate not too low nor that high, and the footsteps are clear to hear, the gunshot sounds are not too low but they aren’t going to blow your eardrums as well.
Astro A40 Dolby Atmos Settings
This Dolby atmo makes the spatial audio so naturally real that anybody can tell and feel the instruments or footsteps are just right behind you. So, if you are an Astro user who loves and enjoys having realistic spatial surround sound then you must know the audio sound settings of it. Here are the steps to follow;
Solution
- Make sure to download the Dolby Atmos Application.
- Click products from the homepage > click Headset > enable the settings by right-clicking the spatial sound icon > click Dolby Atmos For Headphones > now the settings would appear.
- Make sure to switch on the Surround Virtualizer.
For the Game and movie configuration settings;
- Go to Sound Settings > Display and Sound > Audio output > choose Dolby Atmos in Audio Headsets.
- Open Dolby Atmos Application > Settings to modify the equalizers.
- The first band is 32 Hz +1, the Second band is +5, 125 Hz is 0, 250 Hz is -1, 500 Hz is +2, 1k is +4, 2k is +7, 4k is +10, 8k is +8, for the last 16k is +6
- Click apply.
Note: The above are the settings for any game and movie if you want to enjoy it with Dolby Application.
Now, change the other preset configuration for modifying music sound on Dolby;
- The first band should be 32 Hz is +5, the second band is 64 Hz is +9, 125 Hz is +6, 250 Hz is +3, 500k be 0, 1k be -3, 2k is +1, 4k be +5 8k be +9, last one 16k is +5.
- Click Apply.
Note: it works best for any type of music on youtube, mp3, Spotify etc.
Takeaway
Before doing any kind of audio settings, make sure to check for a proper connection to the headset A40 with the devices that you wish to link. This article will guide you in doing proper sound settings of Astro A40 with almost all the possible gadgets that one can get hands-on. This way you will get the most out of your Astros and won’t miss a thing.


![Aftershokz Not Charging [Personally Tested with These Tips]](https://www.boneheadphonesera.com/wp-content/uploads/2022/04/Aftershokz-Not-Charging-.jpg)